Detail Assigned View
Depending on the view and search criteria selected, the transaction summary tab may display posted and unposted invoices, total balance due, payments received against an invoice as well as payment advances displayed as invoices or residuals on the client’s account.
Important: When changing views on the transaction summary tab, keep in mind that the values set in the [Show] filter search criteria settings will always determine what is displayed.
Note: Changing the default search criteria will alter the results described here.

To Access the Transaction Summary
The transaction summary tab can be accessed at either the client or policy level.
- On the Primary menu, click SEARCH. Search for the appropriate client.
- Click the Details
 icon next to the client.
- On the Client menu, click TRANSACTIONS. The transactions summary tab is displayed.
Or
On the Client menu, click POLICIES. Click the Details  icon next to the desired policy. Then, click the transactions tab. The transactions summary screen is displayed.
- In the Select View list, select Detail Assigned.
- In the Search Filter area, click [Show] to reveal and modify the search criteria.
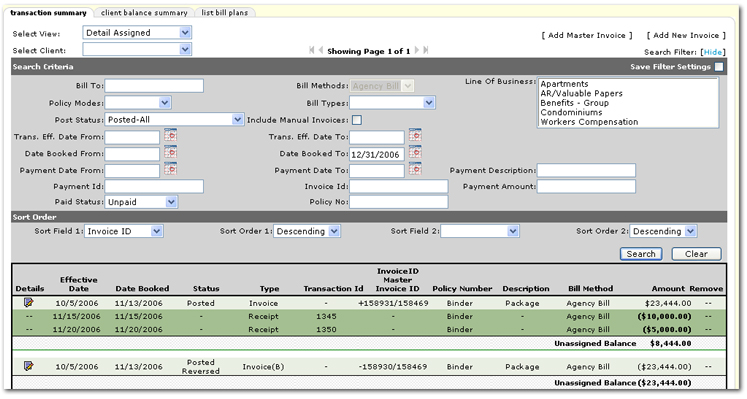
- In the Search Criteria area, the following options are available:

- Save Filter Settings: Selecting the Save Filter Settings check box on the Search Filters screen and clicking Search will change the default Search Filter setting. The next time the transaction summary tab > Detail Assigned view is opened, the transactions returned will be filtered by the saved setting. Exercise caution when using the Save Filter Settings check box with a date range as returned transactions will be restricted to that date range. As a general rule, check the filter settings each time this tab is accessed.
Note: Selecting Save Filter Settings will save the filter criteria only for the view selected. To save filter settings on other views in the transaction summary tab, the Save Filter Settings check box must again be selected when in those views.
- Bill To: The name the invoice is to be mailed to. The Bill To comes from the policy info tab and defaults to the primary named insured.
- Policy Modes: Use the Policy Modes list to select a mode. The available selections are:

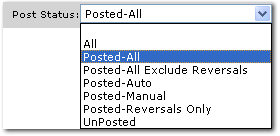
- Post Status: In the Post Status list, select the status that indicates the posting status of the transaction. The default selection in this list is Posted-All which returns all posted transaction in the search results. The available selections are:
- Trans. Eff. Date From: Click the Calendar
 icon to select the beginning date in a date range. A date range can be selected to return all transactions with an effective date within the date range.
- Date Booked From: Click the Calendar
 icon to select the beginning date in a date range. A date range can be selected to return all transactions with a booked date within the date range.
- Payment Date From: Click the Calendar
 icon to select the beginning date in a date range. A date range can be selected to return all transactions with a payment date within the date range.
- Paid Status: In the Paid Status list, select a status that indicates the amount of payment made on the transaction. The default selection in this list is Unpaid which returns all unpaid transactions. The available selections are:

- Bill Methods: The Bill Methods list is disabled. The default selection in this list is Agency Bill which includes direct bill accounts receivable activity in the search results.
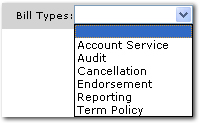
- Bill Types: In the Bill Types list, select a bill type. The available selections are:
- Include Manual Invoices: Select the Include Manual Invoices check box if the policy is issued with a premium increase or decrease and a manual bill for the difference was created after posting the regular invoice.
- Trans. Eff. Date To: Click the Calendar
 icon to select the ending date in a date range. A date range can be selected to return all transactions with effective dates in the date range.
- Date Booked To: Click the Calendar
 icon to select the ending date in a date range. A date range can be selected to return all transactions with booked dates in the date range. The default date selection is the last day of the current month.
- Payment Date To: Click the Calendar
 icon to select the ending date in a date range. A date range can be selected to return all transactions with payment dates in the date range.
- Invoice Id: In the Invoice Id box, enter the full invoice id number to return the specific invoice.
- Policy No: In the Policy No box, enter at least one digit of the policy number. Entering some of the policy number returns a broader result, enter most or the full policy number for more specific results.
- Line of Business: In the Line of Business box, select one or more lines of business to search for the associated transactions. To select more than one line of business, hold the CTRL key while making selections.
- In the Sort Order area, the following options are available:

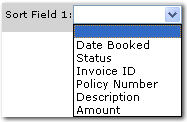
- Sort Field 1: Select a column heading from the Sort Field 1 list. The search results will be sorted by the column selected in the Sort Field 1 list. The available selections are:
- Sort Order 1: Select either Ascending or Descending to set the order of the transactions returned. Ascending will set the order from A-Z. Descending will set the order from Z-A. The Sort Field 1 will be the first sort and Sort Field 2 will be the sub sort.
- Sort Field 2: Select a column heading from the Sort Field 2 list. The search results will be sorted by the column selected in the Sort Field 2 list. The available selections are:
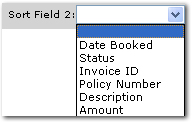
- Sort Order 2: Select either Ascending or Descending to set the order of the transactions returned. Ascending will set the order from A-Z. Descending will set the order from Z-A. The Sort Field 1 will be the first sort and Sort Field 2 will be the sub sort.
- Clear: Click Clear to remove all entries in the Search Filter and Sort Filters fields.
Important: Clicking Clear does not clear the Save Filter Settings check box. All other filter criteria will be removed.
- Search: Click Search. The results of the Search Filter criteria and Sort Filter settings are displayed.

Note: If an asterisk * is displayed in the transaction Status column, an Internal Note has been added to the transaction. Pause the pointer over the asterisk to view the Internal Note pop-up.
Transactions Summary Overview


 icon next to the client.
 icon next to the desired policy. Then, click the transactions tab. The transactions summary screen is displayed.


